VARS Annotation User Guide
This guide gives basic instructions for starting and using the MBARI VARS interface. Useful definitions and descriptions can be found in the glossary. If you need extra help or information, see Contacts.
If your workstation has Flash installed, you can view an animated tutorial of the VARS annotation Interface.
Getting started
- Start the program by double-clicking on the VARS icon.
- This logo will appear while the knowledge base loads—takes a couple of minutes.
- After the knowledge base finishes loading, the annotation interface opens.
- Select File > Connect, and the Connect pop-up will appear.
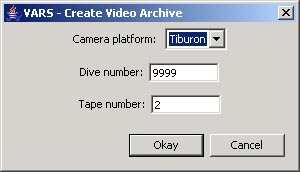
- Select File > Open Archive. The Create Video Archive dialog box appears.
- If you are on a ship, the correct camera platform should appear. If you are
on shore, select the camera platform from the drop-down menu.
- Enter a dive number and tape number and press Okay. You must enter a new tape number each time you change tapes.
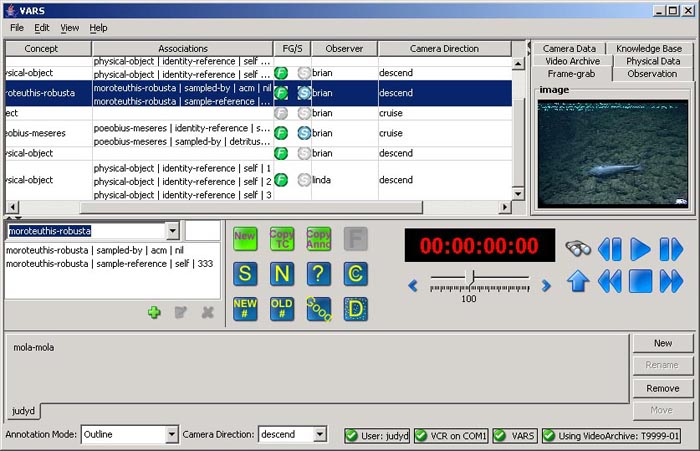
The interface screen now appears as below.
- At the bottom of the screen, choose an annotation mode and a camera direction. Outline mode is for at-sea annotations. The default direction is descend, but the direction should be updated as it changes throughout the dive.
![]()


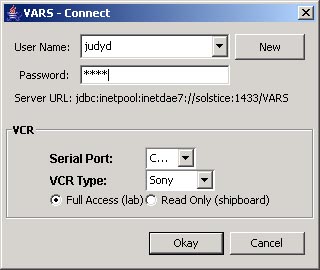
For User Name, type in your MBARI email ID and your password (or type guest). Use your full name if you are an external ROV user. Then
select Okay.
Do NOT use your network password as the VARS administrators can view the password you choose.
Leave VCR type as the default—Read Only—for shipboard use.
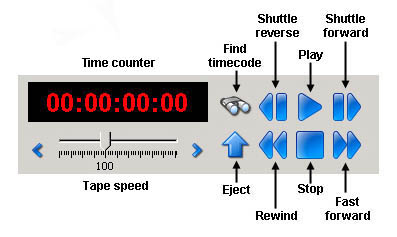
VCR controls
The interface includes a VCR control panel for use in onshore annotation (controls identified below).
NOTE: These controls are NOT usable on the ships.
Adding and modifying annotations
These are basic directions for creating and modifying annotations.
Definitions or descriptions of the various parts of the interface can be found
in the glossary. Some keyboard shortcuts are
included in the instructions.
Adding an annotation with a frame grab
- To associate an observation of an interesting event with a captured image,
click on the frame grab (F) button.
- The frame grab will be displayed in the upper right hand corner of the user interface, under the Frame-grab tab. By default, the concept physical-object will be entered in the observation
column. The F button in the FG/S column of the observation table will be highlighted in green, indicating
there is a frame grab associated with this observation.
- To give the annotation a more specific name (concept), type the concept in
the concept editor (located just under the observation table), and press Enter.
- To add associations (descriptors), click the green + sign. The associations
editor will appear in place of the concept editor.
- Type the associaton in the editor, and press Enter.
- Click the little red STOP button to return to the concept editor.
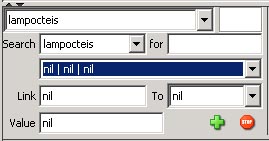
Creating a new observation line
- Click on the New button (or press Cntrl + n on the
keyboard). A line will be created in the observation
table with the default
object in the observation column and with the current VCR time code.
- Type the concept in the editor, and press Enter. The new concept name will be updated in the observation table.
- For faster annotaions see information below about a custom
icon panel.
Deleting an observation
- Highlight the observation line to be deleted.
- Click the red Delete button. The row will be deleted from the table
(with a warning). Multiple lines can also be selected and deleted.
NOTE: VARS has no Undo feature,
so be careful
when deleting observations from the database.
Adding an association to an observation
- Highlight the selected observation row.
- In the concept editor click on the green + button.
- In the box where the cursor is blinking, type the association to be added, and press enter. The first
matching association in the knowledge base will appear.
- Press Enter until the target descriptor appears.
- Press the green + button again to add the association. (The association
editor
will automatically close.)
Deleting an association from an observation
- Highlight the observation row to be edited, so that the associations for that observation will appear in the
concept editor.
- In the editor, highlight the association to be deleted.
- Click the red X (Remove Association) button and the association will
disappear from the concept editor or the observation table.
Duplicating an observation
- Click on the row with the observation to be copied.
- Click on the green Copy Anno button (or press Cntrl + f on
the keyboard). This will duplicate the observation
and its associations to a new row with a new time code.
Creating multiple observations for a single time code
- To create multiple observations with the same time code, click the row with the
desired time code.
- Click the Copy TC button (or press Cntrl + d on the
keyboard).
A new row will appear with the same time code (and same observations).
- Update to the new concept and observations using the concept editor.
Adding the sample association to an observation
- Create a new annotation (with or without a frame grab), and enter the concept being sampled.
- Click on the S (sample) action button to indicate a sample has been taken during that observation.
- A dialog box will pop up, asking for the equipment used and the sample number.
- Enter the sample information, and click OK. The information will be displayed in the
associations column of the observation table and the S button for that row will be highlighted
in blue.
Adding an association using the annotation buttons
- Highlight the selected observation.
- Click on the blue annotation button that represents the association to add. The choices are S (sample), N (population), ? (identity uncertain), C (close-up), New# (new reference number), Old# (old reference number), Good (good image quality), and D (dense population). See buttons in the annotation glossary, for details.
Custom icon tabs
If you do a lot of annotations, setting up a custom icon tab (in the panel area across the bottom of the interface) allows adding new observations quickly.
For this panel, each icon is really a word—specifically the name of a
concept. For efficient annotation, you can create separate tabs for different types of dives, such as Geology or
Midwater, and populate each with the names of commonly observed objects in those
categories.
Creating custom icon tabs
- To create an icon tab, click on the New button
at the right of the
icon panel.
- At the prompt, name the new tab.
- Click on the Knowledge Base tab in the upper right hand corner of the interface.
- In the search box, type the name of the object that you would like to add to the tab. (The first name in the hierarchy
with
those letters will be highlighted.)
- Press Enter until the correct object is highlighted.
- Click on the name, and drag it onto the tab that you created. The name
is now an icon.
- Continue adding icons as needed.
- Organize the icons by dragging them around within the tabs.
- To delete a icon (concept) from a tab, right-click on the icon, and select Delete from the drop-down menu.
- To locate a concept in an icon tab within the knowledge base tree (for reference),
right-click on the icon in the panel, and select Find in knowledgebase tree from the drop-down menu. The concept will be highlighted in its correct position in the
knowledge base.
Adding observations using icons
- Click on the icon with
the name of the concept to be added. The observation will be added to the table
along with the current
VCR time code.
- Add associations as necessary using the Associations buttons or association
editor.
Contacts
For additional help with the VARS Annotation Interface, contact Video Lab administrators:
Email videolabadmin at mbari dot org,
or call 831-775-1829.
For help with technical issues, contact Brian Schlining. Email: brian at mbari dot org